Perforated leather car seats add a premium look and feel to any vehicle – but over time, they can become worn, cracked, or damaged. The good news? With the right tools and technique, even heavily worn areas can be restored to look nearly brand new.
In this guide, we’ll walk through a professional leather restoration process that shows how to repair a damaged perforated seat and make the imperfections virtually disappear.
Table of Contents
Why Perforated Leather Is Tricky to Repair
Unlike standard leather, perforated leather contains tiny holes that are part of the original design. When damage occurs, you’re not just restoring the surface – you also need to recreate the perforation pattern and texture.
That’s what makes this process more detailed and precision-focused.
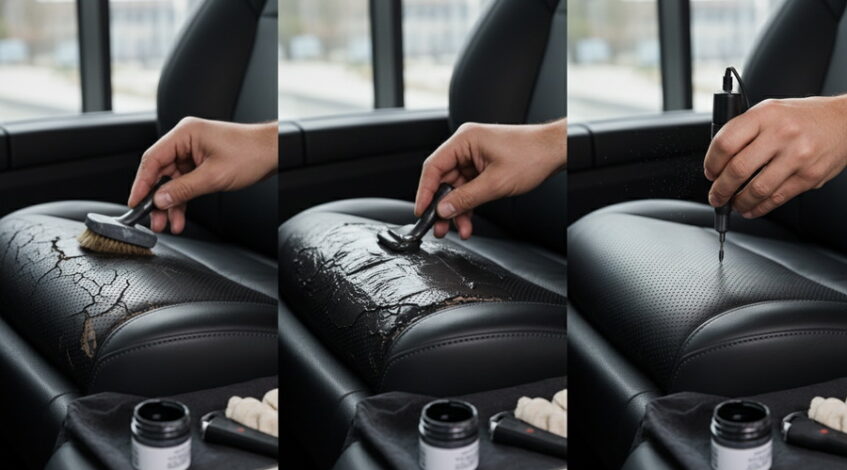
Step 1: Thorough Cleaning Is Essential
Before starting any repair, proper surface preparation is critical.
Use a high-quality foam leather cleaner to remove:
- Dirt
- Body oils
- Residue from previous products
A clean surface ensures that repair materials bond correctly and last over time. Skipping this step can lead to peeling or uneven results later.
Step 2: Apply a Flexible Leather Filler
Once the surface is clean and dry, the next step is to rebuild the damaged area.
- Apply a flexible leather filler paste
- Use a palette knife to spread a thin, even layer
- Smooth it out to match the surrounding surface
After application, cure the filler using a heat gun until it becomes fully dry and firm.
This step restores the structure of the leather and eliminates visible cracks or worn sections.
Step 3: Recreate the Perforation Pattern
This is the most delicate and time-consuming part of the process.
Because the filler covers the original holes, you’ll need to recreate them manually:
- Start with a small pick tool to reopen each hole
- Switch to a rotary tool with a fine needle tip for consistency and speed
Precision matters here—your goal is to match the original factory pattern as closely as possible.
Step 4: Sand the Surface Smooth
Once the perforations are restored:
- Lightly sand the repaired area
- Remove any minor imperfections
- Prepare the surface for dye application
This step ensures a smooth and even finish.
Step 5: Apply Leather Dye (First Coat)
Now it’s time to restore the color.
- Use a high-quality leather dye
- Apply with a fine detail brush
- Carefully work around seams
- Avoid clogging the perforation holes
Apply the first coat evenly and allow it to dry completely.
Step 6: Wet Sand for a Seamless Blend
After the first coat dries:
- Perform a light wet sanding using fine-grit sandpaper (around 1000 grit)
- This helps blend the repaired area into the surrounding leather
It also improves the final texture and finish.
Step 7: Restore the Leather Texture
To match the original grain:
- Use a rotary tool with a texturing head
- Gently imprint a pattern that mimics the factory finish
This step is key to making the repair invisible to the eye.
Step 8: Apply the Final Coat of Dye
Finish the repair by applying a final layer of dye:
- Ensure even coverage
- Match the surrounding color perfectly
- Maintain clean perforations
Once dry, the surface should look uniform and natural.
Final Result: Like New Again
With careful attention to detail, the damaged area becomes virtually invisible. The seat regains its original appearance – clean, smooth, and professionally restored.
Tools & Materials You’ll Need
- Foam leather cleaner
- Flexible leather filler
- Palette knife
- Heat gun
- Pick tool
- Rotary tool (with needle tip & texturing head)
- Fine sandpaper (1000 grit)
- Leather dye
- Detail brush
Pro Tips for Best Results
- Always work in thin layers—thick filler can crack
- Take your time recreating perforations
- Don’t skip sanding between steps
- Match color in natural light for accuracy
- Practice on a test surface if you’re new
Conclusion
Repairing perforated leather may seem intimidating, but with the right approach, it’s entirely achievable. The key lies in preparation, precision, and patience – especially when restoring texture and perforation details.
Whether you’re a professional detailer or a DIY enthusiast, mastering this technique can save you hundreds of dollars and extend the life of your vehicle’s interior.
Trust Professionals for Perforated Leather Car Seat Repair
If your leather car seats have cracks, worn areas, fading, or damaged perforations, professional restoration can make a dramatic difference.
Repairing automotive leather – especially perforated surfaces—requires precision, the right materials, and an understanding of factory textures. Skilled technicians can restore both the appearance and flexibility of the leather while maintaining its original look.
At LaV REPAIR in Jacksonville, FL, we specialize in high-quality leather interior repair and restoration. Using professional-grade fillers, advanced color-matching techniques, and detailed texturing methods, we restore car seats to a like-new condition.
If your vehicle’s interior is starting to show signs of wear, it’s best to act early- before minor damage turns into costly repairs.
Contact LaV REPAIR today and bring your leather car seats back to life.